The Virtual MIDI Keyboard in Ableton Live

In this tutorial, we explain how to use your computer keyboard as both a MIDI keyboard and a MIDI controller.
Just like the Musical Typing Keyboard in Logic Pro X, Ableton Live features a way to use your regular computer keyboard as a MIDI keyboard — but it doesn't stop there. In Ableton, you're also able to use Key Mappings to turn your computer keyboard into a real MIDI controller, and it's all really simple.
Table of Contents
Virtual MIDI Keyboard in Ableton Live
By default, the MIDI keyboard in Ableton Live is turned off. This is, however, a change since version 9 which had the Virtual MIDI Keyboard turned on by default, which might confuse users upgrading from Ableton Live 9 to 10.
If your Virtual Midi Keyboard in Ableton Live is turned off, simply press the M Key on your keyboard or click the Midi Keyboard Icon in your Ableton Live application window.
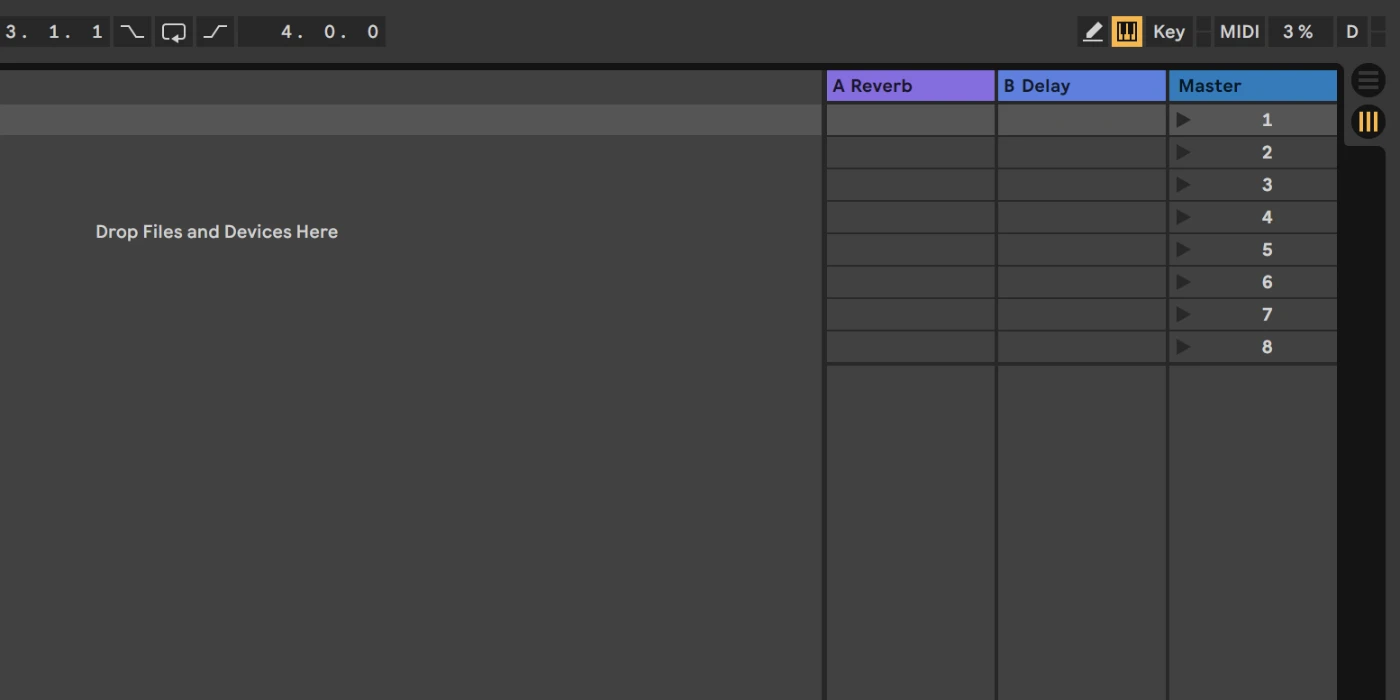
The Virtual MIDI Keyboard in Ableton Live is activated by pressing the M Key or clicking the small keyboard icon in the top right corner of the Ableton Live application.
As soon as the icon lights up, you can use your computer keyboard as a MIDI keyboard and play in real time to try out instruments, sounds, and effects.
Keys Used by the Virtual MIDI Keyboard
When you use the Virtual MIDI Keyboard, the keys on your computer keyboard are effectively turned into piano keys instead. Since there is no visual representation of which key is which (black or white), you just have to practice and learn them.
White Piano Keys
The White Piano Keys are the natural notes on the piano and make up the majority of the piano keys.
| Keyboard Key | Piano Key |
|---|---|
| A | C3 |
| S | D3 |
| D | E3 |
| F | F3 |
| G | G3 |
| H | A4 |
| J | B4 |
| K | C4 |
| L | D4 |
In addition to the natural white piano keys, there are also black keys to complement them in chords and note progressions.
Black Piano Keys
The Black Piano Keys are usually referred to as the flat or sharp keys on the piano. These keys are used to play a semitone (half a note) up or down from its' neighboring white keys.
| Keyboard Key | Piano Key |
|---|---|
| W | C#3 |
| E | D#3 |
| T | F#3 |
| Y | G#3 |
| U | A#4 |
| O | C#4 |
Most chords use combinations of both white and black keys, which makes it essential to learn the locations of both piano key types.
All Piano Keys
When we combine both the White Piano Keys and the Black Piano Keys, the full range of the Virtual MIDI Keyboard is:
| Keyboard Key | Piano Key |
|---|---|
| A | C3 |
| W | C#3 |
| S | D3 |
| E | D#3 |
| D | E3 |
| F | F3 |
| T | F#3 |
| G | G3 |
| Y | G#3 |
| H | A4 |
| U | A#4 |
| J | B4 |
| K | C4 |
| O | C#4 |
| L | D4 |
It might take a while to learn the arrangement, but once you do it's almost like playing a real MIDI keyboard; you just learn by muscular memory where all the correct keys are.
Velocity and Octave Adjustments
You can also change the Current Octave and the Note Velocity when you're playing using the Virtual MIDI Keyboard in Ableton Live.
Navigate Between Octaves
While the Virtual MIDI Keyboard will start with the A Key being C3 you can change the octaves by pressing the Z and X keys;
- The Z Key lowers the range one octave
- The X Key raises the range one octave
This makes it possible for you to play both basslines, in the lower octave ranges, and melodies or leads in the higher octave ranges.
Change Note Velocity
Since your computer keyboard is not velocity sensitive, all notes will be recorded with the same velocity. You can, however, adjust the velocity of the notes by using the C and V keys;
- The C Key decreases (lowers) the Note Velocity by 20 values
- The V Key increases (raises) the Note Velocity by 20 values
The Note Velocity range is between 0 and 127, which means you can toggle the velocity in a total of 7 different strengths.
Key Mapping in Ableton Live
Ableton Live also features the ability to set up custom Key Mapping, which allows you to use any key on your keyboard to manipulate MIDI data; like adjusting the modulation of a synth or simply changing the track volume.
Create Key Mappings in Ableton Live
To create a Key Mapping in Ableton Live, simply press CMD + K on macOS or Ctrl + K on Windows to initiate Ableton's Key Mapping feature. You can also click the Key button next to the MIDI Keyboard button (see the first screenshot).
This will make most of your Ableton Live interface light up in orange:
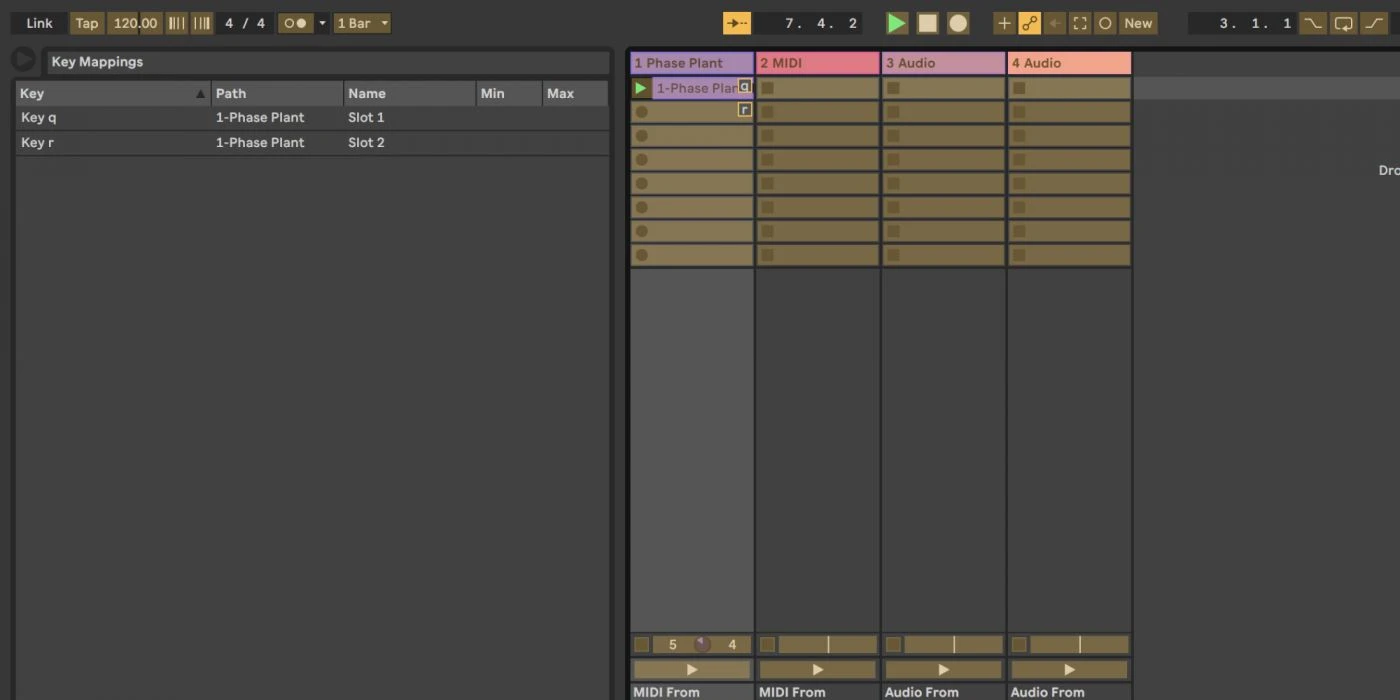
The Ableton Live interface when Key Mapping Mode is activated.
What you need to do now is to bind an interface feature to a key on your computer keyboard, and it's simple.
All you need to do is the following:
- Click the feature you want to bind a key to
- Press the keyboard key you want to use to toggle that feature
Once you've pressed the key on your keyboard, the key bind will show up in the Key Mappings window to the left (as seen in the screenshot above). Here, you can adjust the Min/Max Range Values, delete key mappings and more carefully adjust what you want them to do.
When you're done, simply deactivate the Key Mapping feature the same way you activated it.
Don't Map Important Keys
Just make sure you don't bind a key you need to play the piano keys on your computer keyboard — that kind of defeats the purpose of this tutorial. If you don't need the piano keys, however, you can of course use the entire keyboard.
Reviews

Best Speaker Simulator
Find the best speaker simulator for your money — our favorite doesn't cost much at all.
Best 32-bit Audio Recorders
The hype is real — 32-bit audio recording is here to stay. Here are our top picks.

Best Reverb for Orchestral Samples
Make your Orchestral Samples sound like the real deal by using the reverb effects best suited for the job. Here are our five top picks.

Best Free Piano VST Plugins
Looking for free virtual pianos? We've collected the most popular VSTs that are free and have a great piano sound.
Tutorials

MIDI Effect Plugin Routing in Ableton Live
Get started with MIDI Routing in Ableton Live — it's way easier than you might think.

macOS Virtual MIDI
Get up and running with Virtual MIDI in macOS — it's easier than you think. Here's a quick tutorial on how to activate the IAC Driver.
Spitfire Labs Something Went Wrong
This is how you get Spitfire Labs working again if you've come across the infamous "Something Went Wrong" error.
Tube vs Solid-State Compressors: Understanding the Differences
From warmth to transparency, find the perfect compressor for your audio engineering needs with our guide on tube and solid-state compressors.

The Virtual MIDI Keyboard in Ableton Live
In this tutorial, we explain how to use your computer keyboard as both a MIDI keyboard and a MIDI controller.
Using Saturation and Distortion when Producing Audio
Add warmth and power to your music with saturation and distortion - find your unique vintage tone!
Questions
The Limitations of Ableton Live Lite
Learn all the features and limitations of the cheapest Ableton Live version — Ableton Live Lite.

What is iLok?
Here's everything you need to know about the software copy protection system called iLok.
News
New Features in Ableton Live 12
Ableton Live 12 has been announced, with plenty of new features. Let's take a look.
Ableton Live now supports M1 Macs
After a long wait, Ableton finally delivers and lets M1 users run Live natively.

Luftrum Autumn Sale
Sound designers and plugin developers Luftrum are currently having an autumn sale.
Rodecaster Pro 2 released
Røde has released a brand new version of their popular podcast recording and mixing desk — say hello to the Rodecaster Pro 2.

New Kilohearts Effect: Nonlinear Filter
Find out more about the new Kilohearts effect called **Nonlinear Filter**.
Find the best tools when building your very own music rig, using reviews, tutorials and guides written exclusively for MusicRigs.com — for music creators, by music creators. Links to stores are affiliate links.